NXDN Digital Communications
The NI4CE Digital network is compatible with ICOM IDAS™ and Kenwood NEXedge™ portable and mobile radios. These radios operate with one-fourth the bandwidth of a conventional, analog Amateur Radio transceiver but with clarity that analog transceivers cannot match.
We invite you to explore the advantages and benefits of NXDN digital communications. To help you get started, the West Central Florida Group, Inc. has set-up a NI4CE-NXDN-Users group on Google. To join the group, send your email address to [email protected]. You will find help programming your radio, and understanding the many features of NXDN radios so you can get the most from your NXDN radio.

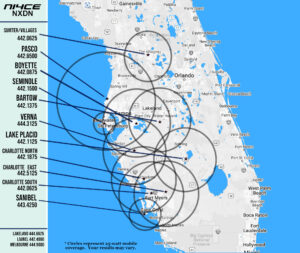
The circles represent 50-watt mobile coverage. Your results may vary.
![]()
Interested in NXDN and want to learn more about it?
A new video is available titled “All About NXDN.” This is a very informative video by Paul NB9X and Tom K9XV that discusses NXDN, its implementation in our area, the radios available, and questions answered from those in attendance. It’s worth the watch to learn about the superb quality digital communications that this mode provides. Click here to checkout this new video.
NEW
WXMsg for NXDN 1.4.0.0 is the latest release of this exciting NXDN Messaging App for Windows. DOWNLOAD HERE
Once you download this file, created a folder C:\WXMsg on your computer and copy WXMsg_1400.zip to that folder. Then extract the file’s content into C:\WXMsg. Read the WXMsg-ReadMe file for installation instructions.
Among the new features with this release is Sound and Color notifiers for key messages, an updated and expanded STATIONS.DAT lookup file, a new Frequently Used Messages tool and a brand new NTS Radiogram Form for sending formal messages.
ENABLING NXDN MESSAGING ON YOUR ICOM RADIO
One of the features of the NXDN Common Air interface is Short Digital Messaging or SDM. This feature enables NXDN radio users to send and receive text messages up to one hundred characters in length right on the NXDN portable or mobile radio.
Unfortunately, Conventional mode SDM was not implemented in the same manner by the two major manufacturers of NXDN radios, ICOM and Kenwood. While each company supports Conventional Mode SDM, how the messages are formatted, transmitted and received is different, not allowing for cross-platform compatibility. If you have an ICOM NXDN radio, you can only send and receive messages with other ICOM radios. If you own a Kenwood NEXEDGE NXDN radio, you will only be able to share your SDM traffic with other Kenwood radio users.
This FAQ is presented to assist ICOM NXDN Radio users who want to enable Short Digital Messaging on their radio.
- To ENABLE Short Digital Messaging, open your ICOM Programming Software. Locate the DIGITAL tab on the programing tree (LEFT side of the window). Expand the tree and click on SDM or MESSAGE.
- Click on MESSAGE SETTINGS to open the programming page. By default, RX Message is OFF. To change this setting to ON, double-click your house on the Settings field and select ON.
- Each time a message is received, it will trigger a RINGER or sounder on your radio to alert you to an incoming message. Click on the Settings field and select the RBINGER you wish to use.
- Finally, your radio can display BELL ICON on the display to visually alert you that a SDM has been received. This option can be toggled ON or BLINK. Select NULL if you do not want to display the BELL icon.
- Some radios that support Vibration-based alerting, like the F3400 / F4400 DS/DT and F52D / F62D portables will also has an option
Some ICOM NXDN radios also allow you to SEND as well as RECEIVE messages. These radios include the F3161/F4161 DS/DT portables, F5061D and F6061D mobiles, F3261 and F4261 DS/DT portables and second generation F3400 / F4400 DS/DT portables and F5400D / F6400D mobile radios.
You can pre-program Messages into these radios using your programming software. Click on the MESSAGE LIST items in the Programming Tree (Left Window). Older radios will allow you to enter up to ten (10) twelve character messages. Newer, second generation radios expand the number of messages to sixteen (16) and allow you to program significantly longer messages, up to one hundred characters in length.
One thing you will want to ENABLE is the ability to automatically SAVE received messages to your radio’s memory for viewing later. This is a two-step process.
- Open the DIGITAL → OPTION page and locate the CALL LOG section.
- Set ENABLE the logging function by setting LOG to ON
- Set LOG ACTION TYPE to LOGGED
- Set LOG FOR MESSAGES to YES.
To VIEW messages at a later time, you will need to assign a Softkey (P0-P3/P4) to access the messages.
In the first generation radios (F3161/F4161, F5061/F6061D) ….
- Go to COMMON → KEY ASSIGN and click on one of the Softkeys.
- From the menu, select the DIGITAL BUTTON option from the menu.
In the second generation radios, the process is a little different. If you have a F52D / F62D, F3400 / F4400 or F5400D / F6400D radio ….
- Go to USERS INTERFACE → KEY ASSIGN and click on one of the Softkeys. This will activate a new selection window.
- Click on the SoftKey you wish to program and select SIGNALING / CALL from the pulldown menu. Now choose the INCOMING option. Click OK at the bottom of this window to complete the assignment process.
While you have your software still open on your desktop, there is one other setting you may want to tweak. This setting will allow you to connect your Windows computer to your radio to enable the keyboarding of SDM traffic in real time.
In first generation radios, open the COMMON → COMMON window and locate the MULTI-CONNECTOR (D-SUB25 PIN) settings.
- Select a BAUD RATE for the serial data connection needed between your computer and the radio.
- Select PC CMD V2 as your MODE option.
With second generation radios, the process is just a little different.
- Go to COMMON → EXTERNAL I/O → OPTION
- Here you will find a couple distinct connection options to choose from. If you are using the Serial Programming Cable as your tether to the computer, use the Multi-Connector/D-Sub 25 pin settings. If you are connecting using a USB Cable, go to the USB Setting section.
- Set your CONNECTION SPEED and your MODE. The MODE should be PC CMD V2.
- If you are using a USB cable, set the USB CONNECTION setting to DATA TRANSFER.
SAVE ALL changes you made to your radio’s profile before WRITING the changes into your radio’s memory.
IMPORTANT NOTE: Once your assign PC CMD V2 to the MODE setting, you will need to press and hold the P0 (first generation) or P1 (second generation) softkey when powering up the radio for re-programming.
VIEWING INCOMING MESSAGES
All incoming SDM messages will initially scroll right to left across your radio’s display. To stop scrolling messages, press any key on your radio.
The procedure for viewing messages that have been logged into memory differs based on the radio you have. First generation ICOM radios will scroll the message right to left across the display. Second generation radios will display the message in a static, word wrapped manner, much the same way messages and text information is presented on cell phones
On First-Generation radios, press the SoftKey you assigned the DIGITAL function to. Messages sent on NXCore Systems are transmitted to a Talkgroup. Then look for the MSG section. Then find your message to display it.
Second-Generations radios will use the SoftKey you assigned to INCOMING. Then select MESSAGES, select the message from the list you wish to view and press the ENTER key. Press the RETURN/Escape key to back out of the message.
We hope you find this document helpful.
-October 28, 2021
